Friday, December 17, 2010

Red dress - muslin fitting #1

I had my first fitting, ya'll! I want to share the experience of having a dress custom made to order. Last time, Barbara took the 18 or so measurements to make a muslin. Actually she made two, she made a muslin for the bodice and one for the skirt. 

I apologize for not having any pictures. When I say muslin, it's just a mock up of the dress made with a cotton fabric. There's nothing fancy, it's just to make sure the fit is correct before cutting the real fabric. Here is an example of a muslin top:

Source

Mine basically looked like that with no sleeves and a much tighter neckline. We started by having me put on the bodice. A muslin is traditionally made bigger so that the dressmaker can pin it correctly to one's body. This bodice fit, not quite like a glove, but pretty darn close. Barbara pinned the back closed (that's where the zipper is going to go) and pinned the back darts and the sides seams just a touch. She also had me sit, breath deeply, and move my arms around to make sure it wasn't too tight and still looked right. And here's another cool thing, she had me do the slouch test. Slouch in it and see how it fits.

Next up, I put the skirt on. She made it a full circle skirt and much too long, just so that we could play with it. Just imagine a skirt from teh 50's (without all the poofyness underneath). When the measurements were taken, I was guessing that I wanted the skirt to start at the top of my hips. But after playing around with it some, we decided it would be best to have it start about belly button level. That way my torso was in proportion to my legs. Just so you know, the higher up the waistband, the shorter the torso (but give the illusion of longer legs). And the lower the waistband, the longer the torso, but the shorter you look. We also decided that it would hit just below my knees.

And now for the cool part. Barbara and Charles, her assistant, drew on me, with a pencil! The bodice of my dress looks kind of like a vest, but it is all one piece. To get the right shape and coverage, they drew directly onto the muslin. Armed with a pencil, Charles started putting in where the the collar started and where the modesty panel would go.

I wish I had taken pictures, maybe next time I'll set up my new camera on a tripod to do it's thing.

Generally, there's only one muslin fitting, but due to the complexity of my dress, I'll go back after Christmas for a second.

Thursday, December 9, 2010

then and now

These photos make my heart melt. Seriously, how sweet is this couple?


Found on Young Me and Now Me.


Tuesday, December 7, 2010

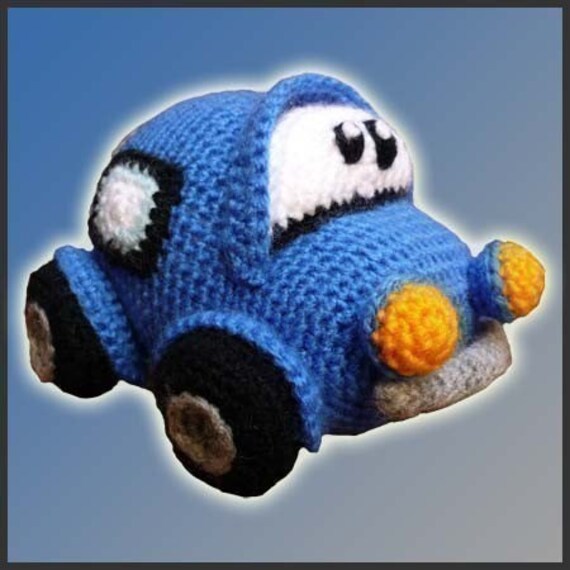
Vrrrrmmm, vvrrrrmm

If you haven't caught on, I'm big into DIY and thinking outside the box when it comes to our wedding. So it should be no suprise to you when I say that we are not having traditional ring pillows. We want our ring bearer(s) to have fun with their "jobs".

Kids can sometimes tire and grow out of toys quickly. But our boys love, and I mean LOVE the movie Cars. How cool would it be to have them "drive" these down the aisle?

Etsy seller: DeliciousCrochet

Saturday, December 4, 2010

Registered!

To be honest, we were not planning to register at all. We basically have everything that we need. And if there is anything we ever want, we are the type that just goes out and gets it. But after some debate, we decided to create a modest registry in anticipation of someone saying "but you HAVE to have one."

There is a lot of debate amongst the wedding ettiquette realm. Do you mention the registry? Obviously, one does not mention it in the invitation. Do you preface it by saying that one's presence is present enough? For us, all we want is to celebrate with our family and friends. Believe us when we say that. We've been to enough weddings to know first hand how much time, money, and effort it takes to travel. Don't get us wrong, it is all worth it to be able to share in our friends happiness. But we do we want anything  more.

Jake with the scan gun!


Your table awaits

Oh escort cards, another one of those necessary details for our wedding. What are they? They're tags that inform guests of their table assignment. From the begining, we planned to go the traditional route of using tent cards like so:

via Girl with a Ring

I even have the mock up printed out. The names and table number on the front, and a short note on the inner
flap asking guests to share their photos with us on shared website (to be determined). But today, as we drove back from Crate and Barrel (we started a registry!), I came up with a different idea.

One Chinese wedding tradition is red envelopes which are also called lucky envelopes (or lai see in Cantonese). For major occassions such as the lunar new year, birthdays, and weddings, money is usually given as a gift. Money is never just handed over, but rather given in a red envelope.
I was struck with the desire to incorporate these in our wedding as a cultural element. But we can't just give these out (empty), some might interpret it as "hey, give us money." Buuuuuuuut, what if we use them as part of our escort cards? Like so:

via The Party Girl

The only drawback is that I won't be saving myself anytime, in fact, I'll be creating more work for myself, but I like the added touch. Not following huh? There are two issues with traditional lucky envelopes. 1) They're kind of expensive. 2) I'm not sure how I would print names on the envelopes themselves. My printer may have issues printing on the slick surface. Also, the gold ink traditionally flakes off, I can't risk ruining my printer. I could just use clear address labels, but both of us HATE them.

Are you probably at the edge of your seat wondering how I'm going to get around these obstacles? OK, I'll share. The plan is to use baby envelopes and a double happiness stamp from Paper Source.