
Tuesday, November 30, 2010


Saturday, November 27, 2010
Milestone: Red dress!
Whooo! I finally found a dressmaker! It's been a long and arderous journey, but I'm glad its over (almost). My friend Natalie and I actually searched all over the Boston area for a dressmaker. But each time the cons outweighed the pros. One place only took your measurements and sent them to Vietnam where they actually made the dress. Other places did not give you any wiggle room for customization other than fabric. We did find one place in Boston that allowed for customization, but the reviews for that vendor were horrendous. Natalie's mom also had a not so great meeting with the shop owner so that swayed my decision not to use them.
I didn't think my original design would be all that hard to make if one started with a commercial pattner. So on a whim, I started searching Craigslist for seamstress/dressmaker/fashion students looking for work. At first I didn't find anything. I tried again a few weeks later. I told myself that it would be my last attempt. If I didn't find anything, I'd just save my money and not have a second dress. Well, the moons must have been aligned just right, because I found Barbara of Anchorage Nine. She had just moved her business from San Fransisco to Somerville and was trying to spread the word. After a couple of emails back and forth, I knew she was the one for the job.
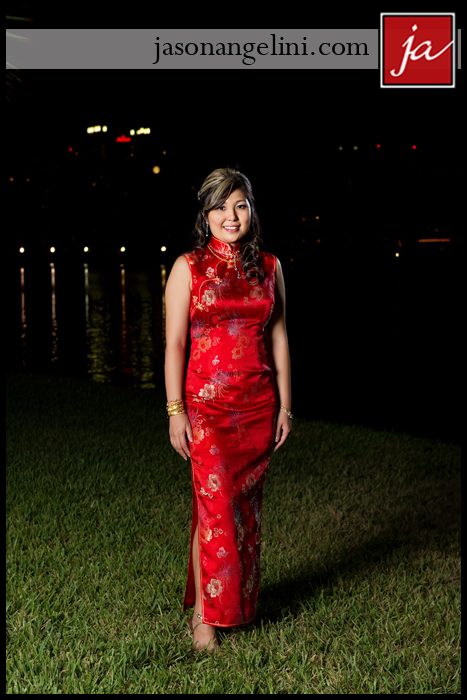
Now let me share with you the evolution of my Chinese dress. This first picture is of a traditional cheongsam or qi pao. It's characterized by the high mandarin collar, ankle length, red fabric, and very fitted cut:
 |
| Jason Angelini Photography |
This second photo is what I thought I wanted initially. Keeping the top half traditional, but flaring the skirt out to give me room to breathe and dance:
 |
| via ze|ciia's flicker |
I wanted more of a v-neck opening so that I wasn’t being choked to death (I'm slightly claustrophobic), but we didn’t know how to make it work with the diagonal closure. Barbara and I tried a couple of ideas, but every idea we had turned out all wonky. Then I found this image online (ignore the skirt, it’s hideous):
 |
| modern cheongsam design by e-fu shop |
I fell in love with this next dress a long time ago. I loved it so much that I found out what pattern was used and my friend bought the pattern to make the dress for me. I was thinking that it could either be my rehearsal dress or reception dress. But life happens, she had her second baby and sewing is on her back burner. Anyways, I loved the skirt and thought it was perfect. It is very "me".

Now combine the skirt with the open neckline design, change the collar, and wah-la: my dress!
 |
My dress! |
Barbara took about 18 million measurements (ok, just 18) a couple of weeks ago and will be starting on the muslin. The muslin is the mock up of the dress using a cheap fabric. It should be finished before Christmas.
Tuesday, November 23, 2010
Project YAY!
I brought up the concept of "yay" flags a couple of months back. Well, they have come to fruition much sooner than I thought. I decided to make them for my wedding cohort of Young(s) and in Love; an early wedding present if you will.
In trying to be a good blogger, that or just to document the process so that I can possibly repeat the project, I took pictures along the way.
Step 1: Purchase premade canvas flags from Oriental Trading Co.
Step 2a: Upon receiving flags, remove wooden dowels and iron fabric flat.
Step 2b: Outsource dowel modification to friends with wood working experience. Big thanks the A. and C.! The dowels are sharpened at one end, like a skewer. For safety reasons, I choose to have it filed down.
Step 3: Size and print out design on paper.

Step 4: Trace design onto plastic stencil. Blank stencil plastic was purchased from Michaels.

Step 5: Cut out design with exacto knife.

Step 6: Mess up and repeat steps 2 and 3.

Step 7: Paint! I used acrylic paint and a sponge brush. Tip: I used a damp paper towel to wipe away excess paint between flags; making sure to wipe away paint on the back side of the stencil (the side that touches the fabric) to keep the image from bleeding. Oh and depending on the paint you use, you might want to take breaks for make sure that you have the windows open ;)
Step 8: Let dry.


Step 9: Dip end of dowel in glue (Elmer's is fine), you just need a dab. Insert dowel into flag and let dry.
Step 10: Say "YAY" and wave them around!

Monday, November 22, 2010
1, 2, 3...
Spend enough time on wedding blogs and you'll start seeing trends like this (over and over):
 |
| via Ruffled |
 |
| via Gator Bride |
Those are cheap dual sided Tolsby photo frames from Ikea that are the latest rage for numbering tables. Perfect, display a photo on one side and the table number on the other. Only I have beef with them. They ONLYcome in a 4x6's. They don't make them as 6x4's. You don't follow? Well, let's say that I want to display photos using those frames. All my pictures would have to be in same shape. I wouldn't be able to do this:
 |
| via Mrs. Hot Wings on Weddingbee |
I could copy Mrs. Hot Wings, but I don't want to. I don't want to have my photos exposed to the elements. Who know's what will happen to them after people throw back a couple of drinks. Even then, food can accidentally get on them, you know. I would want to protect my pictures!
Luckily for me, Ikea has other options. Plastic or Wood. I could go with Nyttja frames or the tried and true Ribba frames (which I already own). The Nyttja frames are plastic with a sheet of plastic. If I go with the smaller one's, 4x6, they're only $0.50 more than the Tolsby's and I can definitely reuse them in our home. But my idea was to have a little bit of matting around the picture so that I had room to place the table number. Definitely doable, but I would need to go up a size and buy/make the matting. Ribba frames are wood with sheet of glass and come pre-matted. The down side is that they're a bit more spendy, 3x the Tolsby for the 5x7's. I also can't seem to find the 4x6 frames online, but I swear that I have one at home. Guess I need to make a trip down to Ikea.
Yay for another project designed and logistics [almost] figured out. And now you know how I overthink the littlest details.
 |
| Nyttja |
 |
| Ribba |
Sunday, November 21, 2010
9 months
Holy crap-a-moley. I know, I know, I say that every month as we count down, but wowzas, time is trucking along.
I am happy to report that we moving on things [slowly]. I almost feel like we're taking care of the little things first, rather than the big ticket items first. What can I say, we're unconventional and like to do things on our own pace.
11 months
I am happy to report that we moving on things [slowly]. I almost feel like we're taking care of the little things first, rather than the big ticket items first. What can I say, we're unconventional and like to do things on our own pace.
- We had our engagement photos taken
- I have my wedding gown - I have it in my closet!!!
- I contracted a dressmaker to create my Chinese wedding dress, more on this later
- We semi-finalized our guest list - yea, most people say to start with this first, maybe we should have...
- We are starting to look at caterers!
11 months
Subscribe to:
Posts (Atom)